BANK NOTE AUTHENTICATION PROJECT
Why Dockers?
For Example, you are shifting the house, While shifting you forget some items in the previous house, in order to overcome this, while we shift you place all items in a container and move to the new house. So, the problem of forgeting items in the previous house has overcome by using cantainer.
In IT industry , for example Developer A has created web application in a system with some system configuration like Operarting System, Ram, CPU etc. Now the developer had given this web application to testing team. Testing team has different system configuration then the web application is not working because the system configurations are different. The Machine Learning application depends on Operating System for example if the first system is Linux and second system is windows in this case their is a lot of library compatability issues will come. To Prevent this we will put all the application in a container called DOCKER CONTAINER and gives to testing team.
Advantages of Dockers
- Environment Standardization
- Build Once , Deploy it anywhere
- Isolation
- Portability
Lets Talk about what was the problem using Virtual Machine and how dockers is solving the problem:-
For example i have 3 Virtual Machines V1,V2,V3 with diffferent configuration. The Main disadvantage is if V1 is not used more & V2,V3 are used heavily the resources of V1 is not used by the V2,V3 i.e the unused resources of V1 is not allocated V2 and V3.
-->Dockers are used to solve the above problem, in dockers the concept of virtualization is used i.e on top of the operating system we create dockers and each dockers as its won properties, id,root folder, Network Configuration i.e Port Number etc. For example we crated 6 dockers on top of the operating system App A,App B,App C,App D,App E,App F. If App C is not utilized more App A,App B,App D,App E,App F can utilize the resouces of App C.
Dockers with Machine Learning:-
Whenever we create project in conda environment we usually create new environment with library mentioned in requirement.txt i.e it looks like we are creating separte virtual machine with library mentioned in requirement.txt. After creating environment, we create the environment as docker container. This container can be deployed anywhere.
##Dataset Link: https://www.kaggle.com/ritesaluja/bank-note-authentication-uci-data
import pandas as pd
import numpy as np
#by seeing the note we need to say whether it is authentic or not
df=pd.read_csv('BankNote_Authentication.csv')
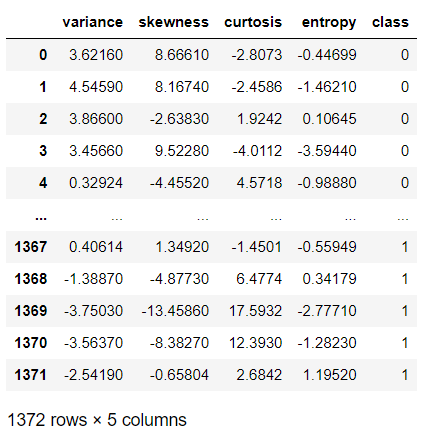
df
pd.value_counts(df['class'])
#we can this as balance dataset
0    762
1    610
Name: class, dtype: int64
### Independent and Dependent features
X=df.iloc[:,:-1]
y=df.iloc[:,-1]
### Train Test Split
from sklearn.model_selection import train_test_split
### Implement Random Forest classifier
from sklearn.ensemble import RandomForestClassifier
classifier=RandomForestClassifier()
classifier.fit(X_train,y_train)
## Prediction
y_pred=classifier.predict(X_test)
### Check Accuracy
from sklearn.metrics import accuracy_score
score=accuracy_score(y_test,y_pred)
score
0.9878640776699029
### Create a Pickle file using serialization
import pickle
pickle_out = open("classifier.pkl","wb")
pickle.dump(classifier, pickle_out)
pickle_out.close()
import numpy as np
classifier.predict([[2,3,4,1]])
array([0], dtype=int64)
#Lets see the front end application using Flask.
from flask import Flask, request
import numpy as np
import pickle
import pandas as pd
app=Flask(__name__)
pickle_in = open("classifier.pkl","rb")
#opening pickel file in read byte mode
classifier=pickle.load(pickle_in)
@app.route('/')
def welcome():
return "Welcome All"
@app.route('/predict',methods=["Get"])
def predict_note_authentication():
variance=request.args.get("variance")
skewness=request.args.get("skewness")
curtosis=request.args.get("curtosis")
entropy=request.args.get("entropy")
prediction=classifier.predict([[variance,skewness,curtosis,entropy]])
print(prediction)
return "Hello The answer is"+str(prediction)
@app.route('/predict_file',methods=["POST"])
def predict_note_file():
df_test=pd.read_csv(request.files.get("file"))
print(df_test.head())
prediction=classifier.predict(df_test)
return str(list(prediction))
if __name__=='__main__':
app.run()
#Lets see how to create front end application using flagger
#in this code we are using flasgger
from flask import Flask, request
import numpy as np
import pickle
import pandas as pd
import flasgger
from flasgger import Swagger
#The swagger helps us to generate frontend part
app=Flask(__name__)
Swagger(app)
pickle_in = open("classifier.pkl","rb")
classifier=pickle.load(pickle_in)
@app.route('/')
def welcome():
return "Welcome All"
@app.route('/predict',methods=["Get"])
def predict_note_authentication():
"""Let's Authenticate the Banks Note
This is using docstrings for specifications.
---
parameters:
- name: variance
in: query
type: number
required: true
- name: skewness
in: query
type: number
required: true
- name: curtosis
in: query
type: number
required: true
- name: entropy
in: query
type: number
required: true
responses:
200:
description: The output values
"""
variance=request.args.get("variance")
skewness=request.args.get("skewness")
curtosis=request.args.get("curtosis")
entropy=request.args.get("entropy")
prediction=classifier.predict([[variance,skewness,curtosis,entropy]])
print(prediction)
return "Hello The answer is"+str(prediction)
@app.route('/predict_file',methods=["POST"])
def predict_note_file():
"""Let's Authenticate the Banks Note
This is using docstrings for specifications.
---
parameters:
- name: file
in: formData
type: file
required: true
responses:
200:
description: The output values
"""
df_test=pd.read_csv(request.files.get("file"))
print(df_test.head())
prediction=classifier.predict(df_test)
return str(list(prediction))
if __name__=='__main__':
app.run(host='0.0.0.0',port=8000)
#At the end end of the URL give /apidocs to use Flagger
-->Install dockers
-->Lets Learn some of the commands used in dockers
- FROM:- From command says from dockers hub what image need to be pickup
- COPY:- Copy from host/local system to user root folder present inside docker image
- EXPOSE:- Exposing the network port number
- WORKDIR:- The root folder working directory present inside docker image
- RUN :- Run is used to install all the dependent library i.e pip install -r requirement.txt
- CMD:- Running the application which is present inside user root folder.
-->STEPS FOLLOWED TO BUILD DOCKER IMAGE
1)Write the Docker File
FROM continuumio/anaconda3:4.4.0
COPY . /usr/app/
EXPOSE 5000
WORKDIR /usr/app/
RUN pip install -r requirements.txt
CMD python flask_api.py
2)Building the Docker Image
Go to Docker and change the path to working directory
docker build -t money_api .
3)Running Dockers
docker run -p 8000:8000 money_api
Refer the below blog by Moez Ali for deplying machine learning pipeline on Google Kubernetes Engine


Comments
Post a Comment